Hey there, if you’ve ended up here, chances are you’re either a fabricator gearing up to add Z purlin production to your lineup, or someone who just took delivery of a Z purlin forming machine from us and has no clue where to start. I’ve been with this company for 7 years—been helping folks get these machines up and running since I first started as a tech support rep right after college, and let me tell you, I’ve seen it all. From people who tried to wing the install to those who skipped a tiny step and dealt with a wonky machine for weeks. This guide isn’t some corporate manual filled with jargon that makes your eyes cross. It’s the real stuff, the exact steps I walk every customer through when they call panicking at 8 PM because their machine showed up that morning. Let’s dive in. Z Purlin Forming Machine
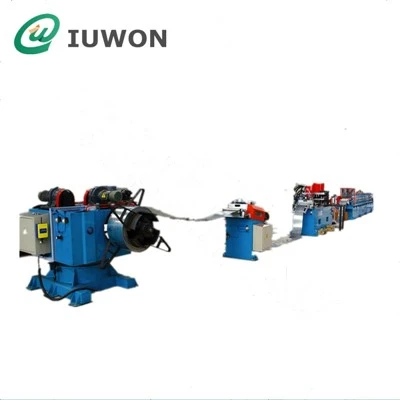
First off, before you even touch a wrench, let’s cover the prep work. This is the stuff that separates a smooth install from a nightmare, trust me. We ship our Z purlin forming machines in crates that are split into three main parts: the uncoiler, the main roll forming unit, and the cut-to-length & stacking system. Those are the big bulky ones—they weigh anywhere from 2 to 5 tons each, depending on the model. So first, make sure your floor is up to snuff. You can’t set this on a flimsy mezzanine or a cracked concrete slab. Our specs say the floor needs a minimum load capacity of 1.5 tons per square foot, and it has to be completely level within 0.5mm over 10 feet. I can’t tell you how many times a customer skips checking this and then emails us saying their purlins are warped and the roll gaps are off. Even a tiny tilt throws the whole alignment out of whack.
Next, clear enough space. Let’s say your machine is 30 feet long—you need 10 feet on the uncoiler side for feeding the steel coil, and another 10 feet on the stacking side for finished purlins. Don’t cram it next to a forklift or a pile of scrap metal; you’ll need room to move around the machine to adjust things later. Also, check your power supply. Our machines run on 3-phase, 480V (most North American models, anyway), and you need a dedicated circuit—no daisy-chaining this with your warehouse lights or a weld station. If you’re not sure about your electrical, call an electrician before the machine arrives. Trying to jury-rig power mid-install is a quick way to blow a motor and set back your startup by a week. Oh, and grab a few things you probably have lying around but won’t want to run to the store for later: a level (the long 4-foot kind for the main unit), a wrench set ( metric, most parts are 10mm to 24mm), a rubber mallet, a tape measure, and a pair of work gloves. No fancy tools required here.
Okay, the delivery is in, the floor is prepped, time to unload. This is where a lot of people mess up—don’t just yank the crates off the truck with a forklift like they would a pallet of boxes. The main roll forming unit is heavy, so you need a forklift with at least a 6-ton capacity, or a mobile crane if you have it. When you lift the crate, look for the lifting points we marked with yellow tags on the crate sides—don’t hook the forks around the bottom, that can damage the frame. Once you have each component in place, start with the uncoiler first, then the main roll unit, then the stacking system. Align them roughly in a straight line, leaving about 6 inches between each unit so you have room to run wiring later.
Now the actual alignment part—this is make or break. Grab your long level. Set it on the top surface of the uncoiler. Adjust the adjustable feet on the bottom of the uncoiler until the bubble is dead center, front to back and left to right. Do the same for the main roll unit, then the stacking system. Once those are level individually, you need to make sure they’re all in a straight line. Take your tape measure and measure from the edge of the uncoiler’s feed opening to the edge of the main roll’s feed opening. It should be exactly in line, so if you hold your tape straight, the distance should be the same at both ends. If it’s off, loosen the mounting bolts for the feet, adjust the unit, and re-tighten. Skip this step, and every purlin you make will have a twist down its length—customers hate that, trust me.
Next up, connecting the units. Our machines have built-in alignment pins, so once the main roll unit is where you want it relative to the uncoiler, line up the pins and bolt them together with the hardware we included. Do the same for the main roll and the stacking unit. That secures them to each other, so now you don’t have to worry about them shifting when you move on to wiring.
Time for power and wiring. First, double-check that the main power switch on the machine is in the “off” position—seriously, this is not the time to be careless. We include a pre-run cable for the power connection, so run that from your dedicated circuit to the machine’s power terminal box, which is usually on the side of the main roll unit. Tighten the terminal screws firmly, but don’t overdo it—you don’t want to strip the threads. Then connect the control cables that link each unit. Each cable has a labeled end (like “UNCOILER” or “STACKER”) so you can’t mix them up. If you do mix them, the machine might throw an error code or not feed properly, so take a second to match the labels.
Once all the wiring is hooked up, do a quick visual check. Make sure no wires are pinched between the frames, no loose bolts are hanging, and all the safety guards are in place. Speaking of safety, if you’re in the US, OSHA requires these guards, and we always include them for that exact reason—never run the machine without the guards on, full stop.
Now for the test run—this is where you’ll catch any last-minute issues before you burn through a whole coil of steel. First, do a dry run without any steel. Turn the main power on, then the control panel. You’ll see a touchscreen (we use easy-to-navigate Siemens panels, no complicated programming) that lets you jog the uncoiler, the roll forms, and the cutter. Jog each component individually first: spin the uncoiler, make sure it turns smoothly without sticking; run the main roll, listen for any weird grinding noises. If something sounds off, turn it off immediately and check the connection. Don’t press on through a weird noise—9 times out of 10 it’s a loose part, and running it will break something.
Once the individual parts work, test the feed. Turn on the automatic feed mode, and you should see the roll forms pull a length of metal (we use a thin test strip, sometimes we include it with the machine) through smoothly. The speed should be consistent, no jerks. If it jerks, that’s a sign your alignment is off a little—go back and double-check the level of the main roll unit, or the straight line between the uncoiler and main roll. A tiny adjustment there usually fixes it.
Then test the cut-to-length function. Type in a length on the control panel, hit “run”, and when the machine reaches that length, the cutter should stop cleanly and chop the purlin. No burrs, no uneven cuts. If the cut is uneven, check the cutter blade alignment—there’s a small adjustment screw on the cutter mount, turn it a quarter turn at a time and test again. Don’t crank it all the way, you’ll break the blade.
After the dry run, you’re ready for your first actual purlin. Use a coil of Z-coated steel (the standard for Z purlins) that’s no thicker than 16 gauge (check your machine’s specs—we have models for 12 to 20 gauge, just don’t use a thicker coil than rated). Load the coil onto the uncoiler: loosen the uncoiler’s side arms, slide the coil on, then tighten the arms until the coil doesn’t wobble. Feed the end of the coil through the guide rollers on the uncoiler, then into the main roll forms. Make sure the steel is centered in the first set of rollers—if it’s off, it will get jammed.
Hit run, and watch it go. Keep an eye on the first 10 feet of purlin to make sure it’s straight, no twists, no dents. Once it’s running smoothly, you can step back. The stacking system will catch the finished purlins, and you can set up a bin to hold them. If you do get a jam, stop the machine immediately—pull the power cord if you have to. Never try to reach into the rolls while they’re spinning, that’s how accidents happen.
Wait, what if something goes wrong? Like, let’s say after 10 minutes, the machine throws an error code. Our tech support line is open 24/7—we’ve got guys on the other side ready to walk you through it, no matter how small the problem. A lot of companies make you pay for after-hours support, but we don’t. If you bought our machine, you’ve got us for life, basically. We also include a printed troubleshooting guide with every machine, but don’t rely only on that—call us first if something doesn’t feel right.
One last tip I always give customers: take 10 minutes at the end of the first day to go over all the bolts again. Vibration from the machine can loosen bolts, especially the ones connecting the units. Tighten everything, check the level one more time, and that’s it. You’re ready to start making purlins.
Look, I get it—installing a big machine like this can feel overwhelming at first. But we design our Z purlin forming machines to be user-friendly, even if you’re not a mechanical expert. The steps aren’t rocket science, they just need to be done in order, and not skipped. If you follow this, you’ll be up and running in a day, not a week.

If you’re in the market for a new Z purlin forming machine, or you have one sitting in your warehouse waiting to be installed, hit us up. We can answer any questions, walk you through the install step by step, and make sure you’ve got everything you need to get production rolling. No pressure, just honest help from people who’ve been in your shoes.
Wall & Roof Roll Forming Machine references:
- Z Purlin Forming Machine Installation and Operation Manual, 2024
- OSHA General Industry Standards for Machinery Safety, 2023
- Siemens Control Panel User Guide for Roll Forming Equipment, 2024
- Structural Steel Framing Specifications for Commercial Construction, 2022
Hanghzou IUWON Technology Co., Ltd.
Address: No.755, Xintangtou Village, Xinjie Street, Xiaoshan District, Hangzhou, Zhejiang
E-mail: sales@iuwon.com
WebSite: https://www.iuwonforming.com/
